Written by MinutesLink — Zoom meeting notes app.
Written with support from MinutesLink — a free AI notetaker for online meetings.
A Zoom test call is a feature designed to ensure your audio and video settings are functioning correctly before your actual meeting. It’s essentially a "test meeting" where you can verify that your microphone, speaker, and video camera are working as expected.

During a Zoom test call, you can adjust your video settings, tweak your microphone input level, test your speaker and microphone, and preview how you’ll appear to other participants. This simple test is invaluable for identifying and fixing potential technical glitches, ensuring a smooth online meeting experience.
A Zoom test call offers several benefits, whether you’re a seasoned meeting host or a first-time Zoom user. Here’s why you should consider it before your next Zoom meeting:
• Avoid technical issues during important calls
Nothing disrupts a meeting like faulty equipment. A Zoom test call helps you avoid embarrassing moments, like your camera not turning on or your microphone producing heavy background noise.
• Test your microphone, speakers, and video camera
With a test call, you can ensure your audio settings, video preview, and internet connection are functioning as expected.
• Build confidence and reduce stress
Knowing your setup is ready eliminates last-minute panic and allows you to focus entirely on your meeting and its agenda.

Have you heard of the infamous "potato filter" story, where a user accidentally had a potato avatar on during a professional meeting? This is a perfect example of what a Zoom test call can prevent—especially for something as important as an important Zoom meeting.
Performing a Zoom test call is surprisingly simple and a great way to ensure everything is set up properly before your meeting. Whether you’re checking your audio, video, or internet connection, a quick test call can save you from technical issues later. Just follow these step-by-step instructions to make sure your microphone, camera, and overall setup are working correctly, so you can join your next call with confidence.

Log in to the Zoom application on either the Zoom desktop client or the Zoom mobile app.
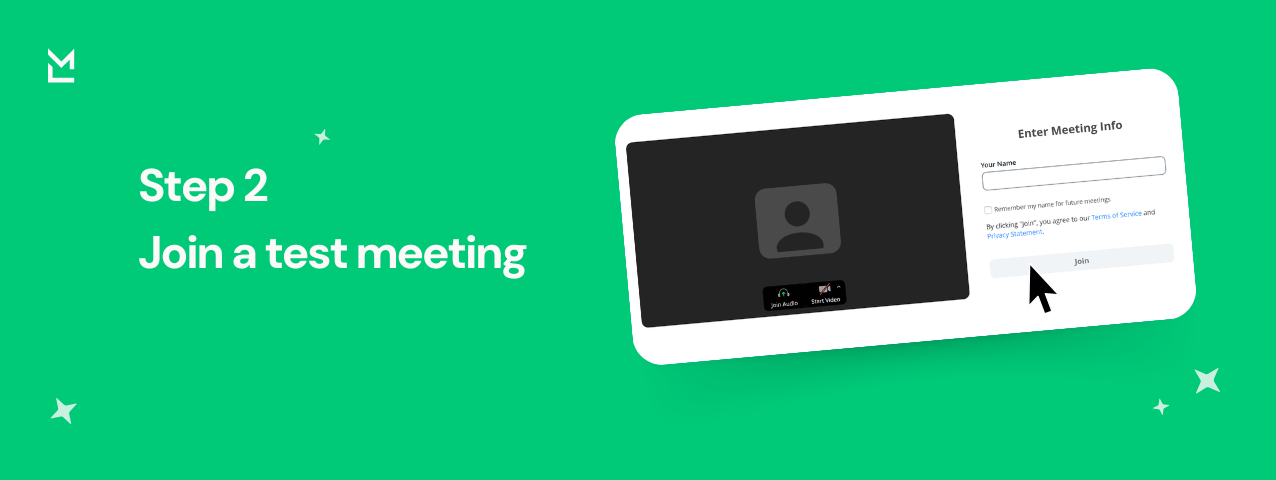
Visit the official Zoom test meeting page by going to https://zoom.us/test, where you can initiate a test call. Click "Join," and Zoom will automatically launch the test meeting. If prompted, download and open the Zoom client, or click “Download & run Zoom.”

• Check your microphone:
Speak into your mic and listen to the playback to ensure your voice is clear.
• Test speaker:
Click "Test Speaker" to hear a test tone and confirm your audio output is working.
• Video settings:
Preview how you appear on camera and adjust your camera or select a different camera, if necessary.

Make any adjustments as needed, such as changing your input level, audio preferences, or lighting for a well-lit appearance. Once you’ve confirmed everything is working properly, you can end the test. You’re now all set for your actual meeting!
Sometimes, even a simple test call can reveal unexpected hiccups. Whether it's audio not working, video issues, or connection troubles, these small glitches can be frustrating. Here’s a quick guide to troubleshoot and resolve common issues during a Zoom test call, so you can ensure your meetings run smoothly.
• Ensure your microphone is not muted and is set as the default input device under audio settings.
• Check for updates in your Zoom app or Zoom desktop client.
• Confirm that no other apps are using the camera.
• Navigate to Settings > Video and click the dropdown menu to switch to a different camera.
• Ensure you’re on a stable high-speed connection. If your connection is weak, consider switching to a wired network.
While a test call ensures your tech is working correctly, productivity during the meeting is a whole different game. This is where MinutesLink can help.
MinutesLink, an AI-powered tool, takes the hassle out of note-taking and meeting productivity by automatically transcribing your online calls, whether on Zoom, Google Meet, or other platforms.
Here’s what you can do with MinutesLink:
• Get human-accurate meeting transcripts and actionable summaries.
• Free yourself from routine tasks like taking notes.
• Stay fully present and focused on what matters—your discussion.

Now that your setup is sorted, follow these tips to make your meeting experience as smooth as possible:
• Check your setup minutes before joining a meeting
Perform one final run-through to verify everything is fine-tuned.
• Optimize your environment
Make sure your space is well-lit, free from background noise, and distraction-free.
• Use a strong internet connection
Prioritize a wired connection or high-speed WiFi network to avoid lag.
• Enable Do-not-disturb mode
Turn on this feature on your devices to avoid interruptions during your meeting.
A Zoom test call is your secret weapon for a smooth, stress-free meeting. With your tools polished and your confidence boosted, you’re all set to host or join professional, hiccup-free Zoom meetings.

For those who want to take meeting productivity to the next level, try MinutesLink. With its advanced AI transcription and actionable summaries, it’s the ultimate assistant for modern professionals.
To test your camera on Zoom, start by opening the Zoom app and signing into your account. Go to the settings menu, usually accessible via a gear icon. From there, navigate to the "Video" section. You should see a preview of your camera feed, allowing you to check if it's working properly. If you're on a call, you can also test your camera by clicking the arrow next to the video icon and selecting "Video Settings" to view the camera feed. Make sure your camera is connected and not in use by another application if it doesn't appear.
To create a Zoom meeting link, start by opening the Zoom app or website and signing into your account. Click on the "Schedule a Meeting" option and fill in the meeting details, including the date, time, and any preferences such as requiring a passcode or enabling a waiting room. Once the meeting is scheduled, Zoom will generate a unique meeting link that you can copy and share with participants.
To test Zoom, start by opening the application and signing in. Use the "Settings" or "Preferences" option to access the audio and video settings, where you can check your microphone, speakers, and camera to ensure they are functioning properly. For a full test, schedule or join a test meeting by visiting Zoom's official test meeting page, where you can confirm that your internet connection, screen sharing, and other features are working seamlessly.
To find your Zoom recordings, start by logging into your Zoom account and navigating to the "Recordings" tab on the dashboard. From there, you can access all your saved recordings, whether they are stored locally on your device or in the cloud. If you’re looking for an easier way to organize and share meeting recordings, consider using MinutesLink. It simplifies managing and accessing your recorded content.
To set up a Zoom meeting, start by opening the Zoom application or website and logging into your account. Click on the "Schedule a Meeting" option, fill in the necessary details like the meeting topic, date, time, and duration, and choose your preferred settings such as enabling a waiting room or requiring a passcode. Once everything is set, save the meeting, and a unique link will be generated, which you can share with participants to join the meeting.
Trusted & Secure


.webp)


.webp)
.webp)
.webp)
%201%20(2).jpg)